Viewing entries tagged
vintage clothing New Year's resolutions

Comment

Wear something meaningful

Care to join me in my November vintage resolution?

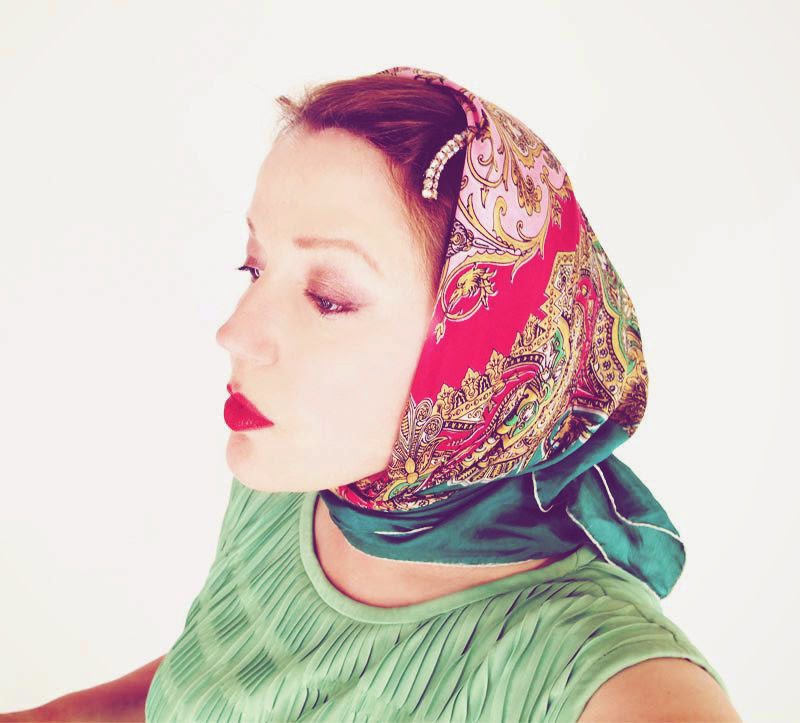
November: Wear something meaningful every day. I have plenty of interesting family items, souvenirs from long-ago vacations, gifts from my favorite people and other items with great karma. I resolve to wear at least one of these each day in November. 

I know many of us have on a wedding ring, locket or some other meaningful item every day, but I’m thinking of the sorts of things that are not usually used every day. I want to seek those items out, think about their history and appreciate them.

I have always been a hoarder of the tiny things that don’t slow down a move—from jewelry to hair clips, socks to scarves—so many smaller items are with me from quite awhile ago.

Today I’ve pulled out a barrette from the 1970s that says VOTE.

My mother caucused for her candidates and went door-to-door for causes she believed in. She took my brother and I with her to watch her vote and never EVER missed voting. This barrette reminds me of her...and reminds me to vote!


Comment

Comment

October resolution: Wear an era I don’t usually wear

You may recall that I decided to tackle one vintage resolution per month this year, and I’ve come to October:

Wear an era that I don’t usually wear. 

At the beginning of the year I thought about wearing 1930s items. I love the prints, the lengths, the jewelry! However, I know it isn’t easy to come by genuine vintage clothing from the 1930s that is actually wearable for more than special occasions.

Then I thought of the retro-inspired fashion that came into vogue around the early 1970s. There were wide-legged pants, platform shoes, turbans, veils, puffed sleeves, cloches, little sweater vests, berets, empire waists, flippy skirts, romantic florals and deco prints, big lapels— inspirations from the 1920s through 40s.

Mr. Natural (source)

I have something to confess. The ONE vintage dress that I sold that most haunts me and I really wish I still had: A retro-inspired early 70s dress in bright blue polyester with Mr. Natural printed all over it.

I guess you kind of had to be there to get why I loved this dress. It was just so cute and odd with this polyester print and early 40s-style puffed sleeves, back tie and shirring at the shoulders. I even asked the good customer who bought it if she would tell me if she ever wanted to sell it. I'm sure it was homemade.

I guess I love the new/old juxtaposition at the time. Some was terribly elegant...and some had Mr. Natural!

Comment

2 Comments

September resolution: Wear hats


My September vintage resolution, as I wrote in January:
I have some beautiful vintage hats and I tend to wear them for special occasions if at all. Everyone tells me they love hats, but just can’t bring themselves to wear them. Maybe they need someone to lead the parade?
So here I am.

2 Comments

Comment

Wear scarves - Bianca Jagger edition

Yesterday I was inspired by Grace Kelly’s iconic wrap, today I am tying my scarf à la Bianca Jagger.

I know you will recognize her white jacket, but she also wore a lovely choker made of a scarf with a pin front and center.

To emulate this, I took a small square scarf, folded it in half diagonally and rolled it to make a band. Because the fabric is on the bias, it has some flexibility and makes a comfortable choker. I added a pin to the front and tied the scarf in back. 

Comment

3 Comments

June resolution: Wear scarves


I have been looking forward to this. Since I-don’t-know-when I have loved and collected scarves.

At the beginning of 2014, I made a list of vintage resolutions, one per month. June is Wear Scarves.

Today? The Grace Kelly wrap...just add sunglasses and convertible!


3 Comments

3 Comments

Make do and mend: 50s skirt tear

Still gloating over my success with stains reported yesterday, I decided to tackle a favorite skirt of mine.

This is one of the few items that I was set to sell, then saw the photos I’d taken and just had to keep. This skirt, dating from the 1950s, is black acetate taffeta with a beautiful flocked pattern. There is an attached black tulle crinoline and the waistband is comfortable elastic with a black velvet surface.

Because of that waistband the skirt is uncommonly easy to wear...and vulnerable. The vulnerability is that when the elastic is stretched, the fabric to which it is stitched can tear. One fairly big tear had been mended by a previous owner.

I often like to imitate how an item was made when repairing, or even follow the lead of a previous mender. In this case I find the mend a tiny bit franken-skirt and I’m not particularly thrilled with the taffeta being sewn to the tulle on the inside. You can see the top of this mend has given out.

This is the newer rip that has developed for the same reason.

I am no expert on this type of repair, but I think it could use a little backing for security. I ironed on dark fusible interfacing with the help of a press cloth, then pick-stitched around the tear. Finally I hand sewed across the opening with moderately small stitches. 

I feel it is nicely secure and reasonably inconspicuous (many thanks to that flocked pattern). Would you have done this differently? It would be great to know the best mend in case I spring another leak. 

 I’m not sure how long this will last but I hope forever, because I love the skirt!

3 Comments

6 Comments

Make do and mend: 3-for-1

I have been running a chemistry experiment of sorts for a week.

I have three very favorite vintage white blouses (two made of cotton and one poly/cotton blend) dating from the 1940s and 50s. All three of these I wore quite often more than six years ago. Their lengthy careers ended abruptly when somehow they got into a warm wash load with bleach.

Have you seen what happens to very subtle underarms stains when they are bleached? Those subtle underarm stains turn an angry shade of yellow that refuses to be removed.

Yes, denisebrain sweats. There I said it.

However I love these three blouses so much that I kept them on the off chance I would find a new solution to their problem.

Because of my resolve to help my fix-me pile this month, I decided to give many solutions a try on these blouses. I like to start from the least toxic alternative and work my way into the nasty stuff.

First it was baking soda paste (with water). If you have unbleached fairly recent underarms stains this can work, but for me this time...nada.

Then it was a slightly diluted white vinegar soak. The blouses smelled like tossed salad and the stains didn’t budge at all.

Next I got out other non-bleach stain removers. Ammonia has been recommended to me by dry cleaners for washable sweat-stained clothing. I gave the ammonia several chances. Then I used Pit Stop, among other things.

PitStop (now called Raise) is, for many cases of recent sweat stains, very effective on washable clothing. However, I’m truly disturbed that the ingredients are not listed on the bottle. Thanks to an about.com page by Mary Marlowe Leverette, I know that the active ingredients are:

- sodium hydroxide, also known as lye or caustic soda

- cocamidopropyl betine, a synthetic surfactant derived from coconut oil and dimethylaminopropylamine

- EDTA or Ethylenediaminetetraacetic acid, a polyamino carboxylic acid

Rubber gloves, open doors, a breathing mask and multiple attempts later...nothing. It didn’t even begin to budge these old bleach-set stains.

Finally in desperation I searched online using terms like “stubborn,” “old,” “bleach-set,” “impossible,” “horrendous”... OK, so I exaggerate slightly. I found The Art of Manliness blog on the subject. With the writer’s six year-old yellowed stains he had no success with ammonia but he had great success with a less toxic solution: OxiClean.

So into the OxiClean went my blouses. In two full days I saw maybe some letting up. In the meantime, I could at least breathe around the soaking solution, so I let the blouses stay in the solution for five days. After five days...100% success! The blouses are cleaner than the’ve ever been and those bleach-set sweat stains finally packed up and went home.

I could practically cry for joy to get these favorite blouses back! It is true that the more epic the effort the better it feels to achieve the goal. I feel pretty good!

Do you have any fabulous stain removal tricks?

Come on, I just told you one of mine! 

6 Comments

Comment

Make do and mend: Old friend edition

It is now day six of my 12-Day challenge to clean or mend 12 items from my own wardrobe. Because for my business I fix a lot of clothing issues, I never get to my own. Or I never used to—but now I’m almost in a habit!

Today I come to a 1970s knit top that has been at the bottom of my mending pile for quite some time. It is nothing fancy and it appears to have been worn quite a lot before it came to me. It was someone’s old friend. It is hard not to love that row of buttons down the front.

I found the top at an estate sale some time ago. I was gathering up vintage clothing when I saw some photos on a bureau and realized that I was in the house of a friend of mine who had passed away a year before. I didn’t know this was the family home in which she grew up and I didn’t recognize the clothing, but when I inquired I found out that this was my friend’s very closet as a teenager.

Of course I had to keep this top. Not only does it have a delightful row of white buttons down its front but it was an old friend—of an old friend.

The top is black nylon knit and it had two not-so-tiny holes on the side front. The hem was stitched with that undependable 1970s plastic thread. One pull and it is out of there, so although only a stretch of hem was missing, I decided to resew the whole thing by hand. Because of the stretch knit I kept the stitches loose enough for give.

 The top is washable but tends to get lots of wrinkles, as you can see.

I sewed the holes up with basically the same technique I use for all knits (here is a tutorial from Lady Ott). The smooth fabric shows a mend but once I had steamed the top (smoothing out the fabric’s wrinkles was easy with a steamer) they weren’t conspicuous.

Now it’s ready to go again.

Comment

Comment

Make do and mend: Broken zipper edition


I have this 1960s pale aqua blue cocktail dress made of elegant silk and wool alaskine. Somehow the metal zipper lost a tooth and became derailed. It’s a sight I hate to see!


Actually, fixing a derailed metal zipper is almost always possible but it can be a bit tedious, so it’s not my favorite repair. While looking at others’ techniques online I found a great idea for just this issue. I used to try to slip the zipper pull back on at the point of the missing tooth. This sometimes took some patience.
Then I found a tutorial calling for snipping a tiny slit below the last tooth. If you have a missing tooth right near the bottom of the zipper this is a huge time saver. The zipper pull was back on track in seconds! Then I just had to whipstitch over the bottom of the zipper a tiny bit above the missing tooth/slit. I also stitched over the very bottom of the zipper as inconspicuously as I could so there would be no gap.

Now here’s a sight I love to see:


Cocktails anyone?
Aqua pearl cocktail from Epicurious.com
Thanks to Kyliie’s Thread for the idea!

Comment

Comment

Make do and mend: Earth Day edition


It is day four of my 12-day mend/fix/clean challenge. Today I’m very glad to keep an item going, because on Earth Day I am especially interested in making do with what I have.

I found an early 1970s suit in a thrift store in 1999, the year I began my vintage clothing business. I saw that it had no buttons on its jacket but I immediately loved it, took it home, found some white buttons to sew on and have worn it all the time since.


Yes it’s double knit polyester, yes it’s loud. On Earth Day about six years ago a music colleague of mine asked me if I would like to join in the local Procession of the Species wearing the outfit. Apparently I looked to him a bit like a wild critter of some sort. I took that as a big compliment.

This outfit was originally sewn with that nasty clear plastic thread that was used in the 1970s. I can’t tell you how many times I have pulled a little bit of that thread only to have the entire hem fall out of a skirt...this one included. I long ago re-sewed the hem. Now the casing at the waistband has come partly unstitched and the elastic is shot.


The elastic has stood up pretty well considering it dates from about 1973, but... 

I don’t have a fancy sewing machine. It has two stitches: Forward and backward. Still, I adore my sewing machine, a vintage Singer Featherweight that belonged to my mother. I restitched the casing and pulled elastic through (my waist size + about 1" in length), sewed the elastic ends together and sealed up the opening. 


Now I have my crazy wonderful suit back in time for Earth Day:


I’ll bet most of you know how to do this, or could easily do this when needed, and it is a very handy skill for vintage clothing appreciators. There are a number of simple tutorials for the technique online, such as this one.

Save your vintage clothing ...and Happy Earth Day!

Comment

Comment

Make do and mend: Day 3

Right now I have several chemistry experiments going on with stains in my favorite clothing...I will report back when I found out which, if any, are successful.

In the meantime I took on the relatively simple job of re-glueing a satin flower on a shoe for my Day 3 project.

These are not just any shoes but my very favorite shoes, and I’m a shoe addict. Made by Walter Steiger in the 1970s, they have ballet slipper-like squared toes and wrapped ankles. The platforms and heels are just perfect to me, both in style and comfort. I could wear these all day every day if they weren’t so dear to me. I wear them only occasionally with the hope they will last forever.

I have a drawerful of glues and a tendency to read every label before I decide which one to use. I think I will stop reading the fine print in great detail now that I know there is a Design Sponge article which includes types of adhesives, a chart of appropriate glues for various tasks, how to glue properly, and even a natural glue recipe. When it comes to glueing fabric, make sure you use one that is appropriate to the cleaning of the item (dry clean only or washable). In this case, the shoes will not be cleaned other than dusting. I used Soba Premium Craft and Fabric Glue.

Mission accomplished, they are ready to step out again!

Comment

Comment

Make do and mend: Easter edition

It is Day 2 of my challenge to mend or clean 12 of my own wardrobe’s items in 12 days. It is also Easter, so I contemplated which of my mending items would look spiffy to wear on Easter Sunday.

I decided the obvious choice was a wonderful late 1930s jacket that has been out of commission for a few years. It is labeled Haddad. If the clothing I find with this label is any indication, the store was a very fashionable place to shop in Spokane. A number of older women have told me how much they loved the place.

This jacket is made of a light, spring-y black wool crepe with bright pink wool jersey lining the front edges and collar. The jacket even has a matching pink jersey dicky. It has little semi-pockets with twisted wool detail around their edges.

The problem has been the covered buttons. Made using the same light wool jersey, these had worn through to the point of being unusable.

This is where my one hoarding instinct has come in handy: I collect vintage buttons, and most especially sets of vintage buttons. Many button collectors are after a single perfect vintage button, but my eyes are always open for a set that can replace those that are missing on my vintage clothing finds.

In my black button stash I have a couple of great old buttons in plastic and four faceted black glass buttons. I need five for my jacket. I have cards of vintage buttons in black but these just don’t seem sufficiently interesting for this stellar jacket.

I eventually came across this set, probably of roughly the same era as the jacket. I would prefer a button with a shank, but I love the beaded-look detail.

If I’ve learned anything from mending my vintage clothing finds, it is to try to imitate what is already there. These buttons were sewn with substantial thread shanks, and without any of their sewing thread showing on the back of the placket, because that pink lining was made to show and you wouldn’t want black threads interfering.

I used to think that sewing a button was just a matter of running six stitches through the button, but had to rethink my button sewing technique when I saw how many vintage buttons were sewn with thread shanks.

There is an easy and clear tutorial about sewing a button the right way, with a thread shank, over on the Chronicle Books blog.

Just one case of gnarled-up thread and one needle poke later, I had myself a newly restored jacket. See how nicely these buttons complement the pocket detail?

And it’s ready just in time for my Easter promenade. Happy Easter everyone!

Comment

Comment

Make do and mend: The 12-day challenge

In my last post I explained how busy a month it is for me and how hard it is to get to mending and cleaning of my favorite clothing with a schedule that is packed to bursting.

Now there are 12 days left in the month and 12 items are on my agenda to fix. Can I do it? I’m not entirely sure! Stay tuned to find out.

I am starting today with one of my favorite items in need of help, a relatively recent (purchased about four years ago) jacket by Anne Klein. It was radiant orchid before anyone was talking about radiant orchid, and when I wear this jacket people tend to comment on how good the color is on me.

Last fall I was on a weekend trip to Seattle and Ibeing Mistress of the Grand Gesture—ripped out a seam at the back of an armhole. I didn’t have a sewing kit with me so inquired about one at the desk of the motel where we were staying. The best color thread in their little give-away kit was closer to Seattle Sky Grey than Radiant Orchid but I made do and tried to sew up the seam thoroughly and as inconspicuously as possible.

This was meant to be very temporary but of course I didn’t go to replace the stitching until today, a few days after my hand sewing ripped out. This time I did it right, with a sewing machine. I had to unpick the lining for a short stretch at the hem in order to get at the seam properly, but once it was open I could make a sturdy machine-sewn repair.

I happened to have the exact right color of thread from a project in the 1980s (this color is not new!) and I sewed the seam twice, being the Grand Gesture Princess. I briefly thought of reinforcing the other armhole in case I might care to wave my left arm about madly in the future, but decided I’m too much of an optimist.

Then all that remained was to hand sew the short stretch of lining at the hem.

And here it is, my sturdy seam, ready for one of my famous grand gestures:

Comment